Our journey into the culinary world often becomes more exciting as we pick up new skills. Today’s focus will be on *how to debone a chicken thigh*. It’s helpful when your recipe calls for boneless thigh meat or simply because you prefer it that way.

Getting Prepared: Gather Your Tools and Ingredients
Before you begin deboning the chicken, it’s important to ensure that you have the right tools and ingredients. At the bare minimum, you’ll need a sharp boning knife or a paring knife, a cutting board, and of course, the chicken thighs themselves. Lay out everything on your kitchen workspace for easy access and let’s dive right in.
Something important to note is that kitchen safety should always come first. This involves using a stable and well-cleaned cutting board and ensuring your knives are sharp. A sharp knife not only makes the job easier but it’s actually safer, reducing the likelihood of the knife slipping.
Step 1: Start by Cleaning the Chicken
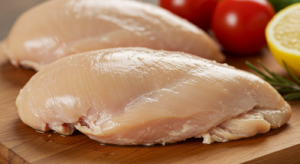
After your tools are ready, start the process of boning chicken thighs by cleaning them. Rinse the thigh under cool running water, then pat them dry using paper towels. It’s essential to remove any excess fat from the chicken thigh as it can make the end result heavy and overly greasy.
You might want to take your time in this process. Look carefully for stray feathers, blood spots or anything else that may affect the final dish. The chicken should be pretty clean coming from the store, but it never hurts to double-check!

Step 2: Identify the Thigh Bone
The next step in our step by step guide requires you to familiarize yourself with where exactly the thigh bone is located. Have the thigh skin side up and feel around the center of the thigh with your fingers. The thigh bone should be easily locatable as a hard, elongated structure.
When you have identified the bone, it’s easier to picture how you will cut around it. The goal is to cut around each side of the bone without tearing the meat unnecessarily. Remember, it’s much better to cut less meat than needed, as you can always trim more later.

Step 3: Make Initial Cuts
Using your sharp knife, make a cut along the length of the bone on the thigh skin side. You don’t need to cut too deep, just enough to expose the bone. For beginners, it might be a good idea to start with shallow cuts until you gain more confidence.
Once you’ve made the initial cuts, use your fingers to feel around the bone. Try to separate the meat from each side of the bone gently. Use your knife where necessary but do remember to use it with caution to avoid any accidental cuts.

Step 4: Carefully Remove the Bone
Now, it’s time to remove the bone. Hold the loose end of the bone with one hand, and with the other, use the knife to cut the attaching tendons and flesh. Be patient and make sure to follow the contours of the bone closely.
Remember to handle the thigh gently as you’re deboning. You don’t want to destroy its shape or cut through the skin. If done correctly, the bone should come out cleanly, leaving you with a perfectly boned chicken thigh.

Step 5: Trim the Meat
Once the bone has been removed, you’re not quite finished. Look over the meat to ensure there are no splinters or small bone fragments. Also, at this point, you might find bits of cartilage or excess fat that need to be trimmed off.
Closer inspection often reveals areas that could be cleaned up further. Use the boning knife to make these modifications if required. Your goal is to have a neat, clean piece of meat, ready for your favorite recipe.

Step 6: Use the Deboned Thigh in Your Recipe
Lastly, use the deboned chicken thigh in your recipe. Whether you are stir-frying or baking, the lack of bone should make eating easier and more enjoyable, especially for kids. The bonus is recipe calls for deboned chicken thighs are versatile, allowing a variety of dishes.
Always handle your deboned thigh with care. Overhandling can lead to tearing, which isn’t ideal. Boned or not, the chicken thigh is a delicious part of the chicken that has bits of fats running through it to keep it moist and flavorful.
How long does it take to debone a chicken thigh?
With practice, you can debone a chicken thigh in under 2 minutes. However, for a beginner, it might take about 10 minutes per thigh as they familiarize themselves with the process and the feel of the meat.
Which knife is best for deboning a chicken thigh?
A boning knife is excellent for deboning due to its sharp, thin, flexible blade that can easily cut around and under the bone. However, a sharp paring knife can also get the job done.
Can I use the removed thigh bones for anything?
Yes, absolutely! Thigh bones are perfect for making homemade chicken broth or stock. You can store them in the freezer until ready to use.
Which side of the chicken thigh do I start the cut?
Start with the thigh skin side up. This allows you to easily access and identify the thigh bone.
Do I have to remove all the fat on the chicken thigh?
Not necessarily. Some fats are necessary to keep the meat moist and flavorful during cooking. However, any large amounts of excess fat can be trimmed off.
Can I debone a chicken thigh without a boning knife?
Yes, a sharp paring knife can also effectively debone a chicken thigh.
Will the cooking time change when using deboned chicken thighs?
Yes, deboned thighs cook faster than bone-in thighs. So, adjust your cooking times accordingly.
What dishes work well with deboned chicken thighs?
Boned chicken thighs work great for stir-fries, baked dishes, grills, and kebabs, to name a few.
Will the chicken thigh lose flavor if I remove the bone?
Generally, bones add flavor to meat during cooking. However, a well-seasoned, well-cooked deboned chicken thigh will still taste delicious.
Can I debone all the chicken parts in the same way?
Each part of the chicken has a unique bone structure, so the method of deboning might slightly vary. However, the basic principles remain the same.